Deploy your Hugo blog to AWS S3 and CloudFront for a secure, globally-distributed website. This complete guide covers architecture diagrams, security best practices, and automation to get your blog live with a global CDN.
Prerequisites
This post is the second part of a series on building and hosting a blog with Hugo. Before diving into deployment, make sure you’ve completed the first post:
📖 Create Your Own Hugo Blog - Learn how to install Hugo, set up a site, install PaperMod, create posts, and configure metadata.
This post assumes you have a working Hugo blog running locally and are ready to take it live!
Now that you have a beautiful Hugo blog, it’s time to deploy it! In this post, I’ll walk you through how to host your Hugo website on AWS S3 and use CloudFront for a blazing-fast CDN. The best part? You can use AWS’s free tier to get all of this for free!
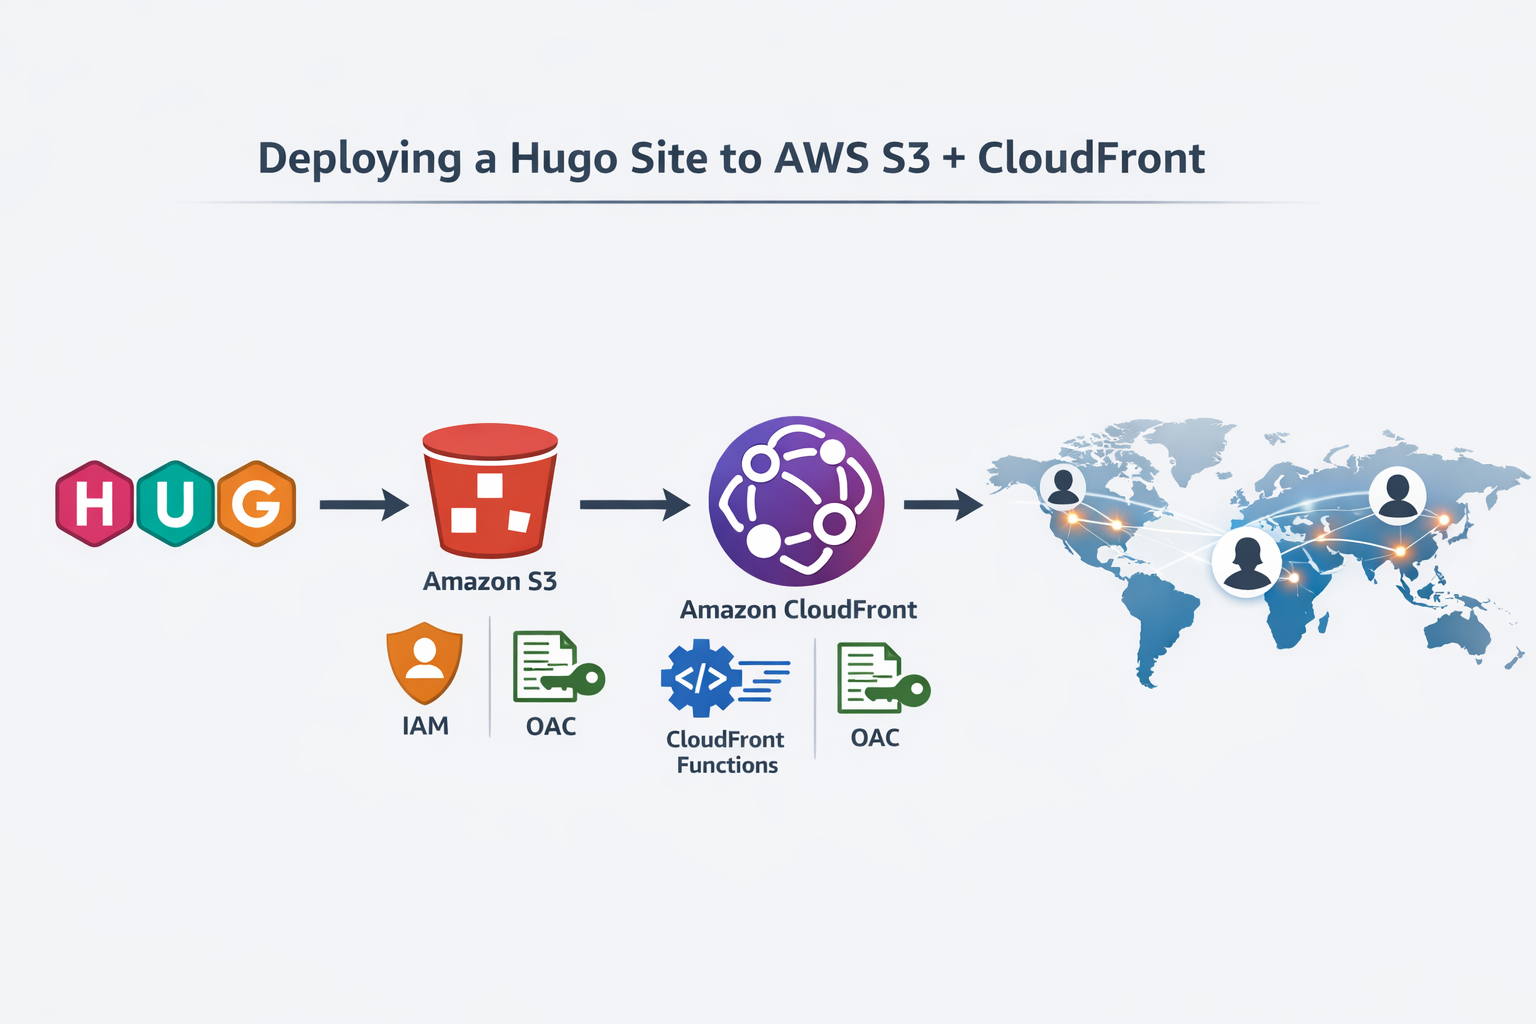
Solution Architecture Overview
Before we dive into the technical setup, let’s understand what we’re building from a solution architecture perspective. This is a serverless static website hosting solution—no servers to manage, auto-scaling included, and highly available globally.
Architecture Diagram
                                    Users Worldwide
                                          |
                                          v
                                  ┌─────────────┐
                                  │  CloudFront │
                                  │     CDN     │
                                  └──────┬──────┘
                                         |
                        ┌────────────────┼────────────────┐
                        |                |                |
                   (cached)         (cache miss)    (pretty URLs)
                        |                |                |
                        v                v                v
                   ┌─────────┐    ┌────────────────┐  ┌──────────┐
                   │  Edge   │    │  Origin Access │  │CloudFront│
                   │Locations│    │    Control     │  │Functions │
                   │(99 PoP) │    │    (OAC)       │  │(URL rewrite)
                   └─────────┘    └────────┬───────┘  └──────────┘
                                           |
                                           v
                                  ┌─────────────────┐
                                  │   S3 Bucket     │
                                  │  (Private)      │
                                  │ ┌─────────────┐ │
                                  │ │ index.html  │ │
                                  │ │ posts/  ... │ │
                                  │ │ css/js/ ... │ │
                                  │ └─────────────┘ │
                                  └─────────────────┘
                                           ^
                                           |
                                    (upload via)
                                           |
                                  ┌─────────────────┐
                                  │  Your Computer  │
                                  │  (AWS CLI)      │
                                  │  (IAM User)     │
                                  └─────────────────┘
What We’re Building
This architecture solves several problems:
| Component | Purpose | Benefit |
|---|---|---|
| Hugo (Static Generator) | Converts Markdown files to HTML | Fast, secure, version-controllable content |
| S3 Bucket | Stores static HTML/CSS/JS files | Cheap, durable, scalable content repository |
| CloudFront CDN | Caches and serves from 100+ edge locations worldwide | Lightning-fast load times globally, built-in DDoS protection |
| Origin Access Control (OAC) | Restricts S3 access to CloudFront only | No public bucket access, maximum security |
| CloudFront Functions | Rewrites URLs (/posts/my-post/ → /posts/my-post/index.html) | Pretty URLs without server-side logic |
| IAM User (Least Privilege) | Credentials to deploy updates | Minimal attack surface, controlled permissions |
Data Flow
- Development: You write Markdown posts locally
- Build: Hugo generates static HTML files in
public/ - Deploy: AWS CLI uploads files to private S3 bucket
- Cache Invalidation: CloudFront cache refreshed to serve latest content
- Edge Delivery: Users download from nearest CloudFront edge location
- Pretty URLs: CloudFront function rewrites requests on the fly
Why This Architecture?
- Cost: Free tier covers small blogs; minimal cost for traffic
- Performance: Global CDN with ~99 edge locations = <100ms latency worldwide
- Security: No database, no server exploitation risks, HTTPS enforced
- Reliability: S3 durability is 99.999999999%, CloudFront has redundancy
- Scalability: Auto-scales to millions of requests without configuration
- Maintenance: No patching, no server management, fully managed services
Setting up AWS
First, you’ll need an AWS account. Head over to AWS and create one if you don’t have it already. AWS gives you a free tier for the first 12 months, which includes S3 storage and CloudFront bandwidth.
Creating an S3 Bucket
Log into the AWS Console and navigate to S3. Create a new bucket:
- Click “Create bucket”
- Give it a name (e.g.,
my-awesome-blog). Bucket names must be unique across AWS, so choose something specific to you. - Keep “Block all public access” enabled (this is the default and is secure)
- Enable “Bucket Versioning” (allows recovery if something goes wrong)
- Click “Create”
Your S3 bucket is private by default—only CloudFront (via Origin Access Control) can read from it. This is the correct security posture.
Important: Do NOT make your bucket public. All traffic should flow through CloudFront.
Creating an IAM User
Instead of using your main AWS account credentials (which is a security risk), create an IAM user with limited permissions only for your specific bucket and CloudFront distribution. Follow the principle of least privilege—give it only what it needs.
- Go to IAM in the AWS Console
- Click “Users” and then “Add user”
- Give it a name (e.g.,
hugo-deployer) - Select “Access key - Programmatic access”
- Skip attaching managed policies and instead create a custom policy (see below)
- Click through and create the user
Creating a Custom Policy
After creating the user, attach this custom policy (replace your-bucket-name and DISTRIBUTION-ID with your actual values):
{
  "Version": "2012-10-17",
  "Statement": [
    {
      "Effect": "Allow",
      "Action": [
        "s3:GetObject",
        "s3:PutObject",
        "s3:DeleteObject",
        "s3:ListBucket"
      ],
      "Resource": [
        "arn:aws:s3:::your-bucket-name",
        "arn:aws:s3:::your-bucket-name/*"
      ]
    },
    {
      "Effect": "Allow",
      "Action": [
        "cloudfront:CreateInvalidation"
      ],
      "Resource": "arn:aws:cloudfront::YOUR-AWS-ACCOUNT-ID:distribution/DISTRIBUTION-ID"
    }
  ]
}
To find your AWS Account ID, go to IAM > Account settings. This policy only allows:
- S3 operations on your specific bucket only
- CloudFront invalidations on your specific distribution only
- Nothing else
Important: Download your Access Key and Secret Access Key. Store them securely (never commit them to git!)
Installing AWS CLI
Install the AWS CLI on your machine:
MacOS
brew install awscli
Linux
sudo apt install awscli
Windows
choco install awscliv2
Configuring AWS Credentials
Once installed, configure your credentials:
aws configure
You’ll be prompted for:
- AWS Access Key ID (from the IAM user you created)
- AWS Secret Access Key (from the IAM user you created)
- Default region (e.g.,
us-east-1) - Default output format (just press enter)
Your credentials will be stored in ~/.aws/credentials (on Linux/Mac) or %USERPROFILE%\.aws\credentials (on Windows).
Security tip: Never commit your .aws/credentials file to git. Add it to .gitignore if you haven’t already. Also rotate your access keys every 90 days for better security.
Building and Uploading Your Site
Now the exciting part! First, build your Hugo site:
hugo
This generates all the static files in the public/ folder. Then, sync these files to your S3 bucket (replace your-bucket-name with your actual bucket name):
aws s3 sync public/ s3://your-bucket-name
This command uploads all files from your public/ folder to your S3 bucket. You can run this command every time you want to deploy new changes!
Setting Up CloudFront
CloudFront is a Content Delivery Network (CDN) that caches your website across the globe, making it super fast for users everywhere. And it’s free!
- Go to CloudFront in the AWS Console
- Click “Create distribution”
- For “Origin domain”, select your S3 bucket
- Important: Under “S3 access”, select “Yes, use Origin Access Control (OAC)”
- This ensures only CloudFront can access your private S3 bucket
- AWS will show you a bucket policy to add—copy and paste it into your S3 bucket policy
- Scroll down and ensure “Viewer protocol policy” is set to “Redirect HTTP to HTTPS” (HTTPS only)
- Check that “Compress objects automatically” is enabled (makes your site faster)
- Click “Create distribution”
CloudFront will generate a domain for you (e.g., d12345abcde.cloudfront.net) and an SSL certificate automatically. This is your website URL!
CloudFront Function for Pretty URLs
One problem: Hugo creates posts in folders like /posts/my-post/index.html, but users might access /posts/my-post/ without the index.html. To fix this, create a CloudFront function:
- In CloudFront, click “Functions” in the left menu
- Click “Create function”
- Name it something like
hugo-pretty-urls - Paste this code:
function handler(event) {
    var request = event.request;
    var uri = request.uri;

    // If URI ends with '/', add index.html
    if (uri.endsWith('/')) {
        request.uri += 'index.html';
    }
    // If URI has no extension, add /index.html
    else if (!uri.includes('.')) {
        request.uri += '/index.html';
    }

    return request;
}
- Click “Publish”
- Go back to your distribution
- Click “Edit” and scroll to “Function associations”
- Under “Viewer request”, select “CloudFront Functions”
- Select the function you just created
- Click “Save changes”
Now all your pretty URLs will work perfectly!
Invalidating CloudFront Cache
Here’s an important part: every time you upload new files to S3, CloudFront still serves the cached old version for a while. To make your changes appear instantly, you need to invalidate the CloudFront cache.
Find your CloudFront Distribution ID:
- Go to CloudFront in the AWS Console
- Click your distribution
- Copy the Distribution ID (looks like
E1ABCDEFGH123)
Then run this command after each deployment (replace YOUR_DISTRIBUTION_ID with your actual ID):
aws cloudfront create-invalidation --distribution-id YOUR_DISTRIBUTION_ID --paths "/*"
This tells CloudFront to refresh all files (/*), so your latest changes appear immediately.
Custom Domain (Optional)
If you have a custom domain, you can point it to CloudFront:
- In CloudFront, edit your distribution and add your domain under “Alternate domain names”
- CloudFront will automatically create and manage an SSL certificate for your domain (AWS Certificate Manager)
- In Route 53 (or your domain provider), create an
Arecord (not CNAME) pointing to your CloudFront domain
Your site will now be accessible at https://yourdomain.com with automatic HTTPS!
Automating Deployments
Every time you update your blog, you need to:
- Build your site
- Upload files to S3
- Invalidate CloudFront cache
Instead of running three commands, create a deployment script. Save this as deploy.sh:
#!/bin/bash
set -e

BUCKET_NAME="your-bucket-name"
DISTRIBUTION_ID="YOUR_DISTRIBUTION_ID"

echo "Building Hugo site..."
hugo

echo "Uploading to S3..."
aws s3 sync public/ s3://$BUCKET_NAME

echo "Invalidating CloudFront cache..."
aws cloudfront create-invalidation --distribution-id $DISTRIBUTION_ID --paths "/*"

echo "✓ Deployment complete! Changes live in ~30 seconds."
Make it executable:
chmod +x deploy.sh
Now deploy with one command:
./deploy.sh
If you prefer a one-liner without a script:
hugo && aws s3 sync public/ s3://your-bucket-name && aws cloudfront create-invalidation --distribution-id YOUR_DISTRIBUTION_ID --paths "/*"
Summary
You now have a blazingly fast, globally distributed blog hosted on AWS, all for free! Here’s what we accomplished:
- Created a private S3 bucket with versioning enabled
- Set up an IAM user with least-privilege custom policies
- Configured AWS CLI for easy uploads
- Set up CloudFront with Origin Access Control (OAC)
- Enforced HTTPS encryption for all traffic
- Created a CloudFront function to handle pretty URLs
- Set up cache invalidation to make changes appear instantly
- Automated the entire deployment process with a script
AWS Best Practices Summary
Here’s what makes this setup secure and resilient:
- Least Privilege IAM Policy - The IAM user can only access your specific S3 bucket and CloudFront distribution, nothing else
- Private S3 Bucket - Your S3 bucket is not publicly accessible; only CloudFront can read from it via Origin Access Control
- HTTPS Enforced - All traffic is encrypted via CloudFront’s automatic SSL certificates
- Versioning Enabled - You can recover from accidental deletions or corrupted uploads
- Access Logs - CloudFront can be configured to log all requests for security audits
- Short-lived Access Keys - Rotate your IAM access keys every 90 days (never hardcode secrets in scripts!)
Your Hugo blog is now live on the internet with enterprise-grade AWS security! Pretty cool, right?